Hello and welcome!

Welcome!
This blog is an extension of The Home Maker's Corner. Regarding use of content: please see "the fine print" at the bottom of this page.

Showing posts with label Lebanese. Show all posts

Tuesday, May 27, 2014

Tabbouleh - A Middle Eastern Salad


Another rerun from the early days of this blog.  This was first posted on the afternoon of Feb. 26, 2009. :-)
----------------

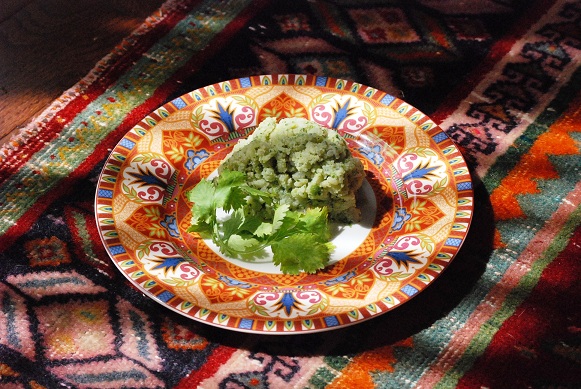
We started making and eating our own Middle Eastern food sometime while I was in my teens. This refreshing parsley salad quickly became a family favorite. We shared it with our church family and it was a hit there too. In fact, one girl who was finicky about "green food" actually found that she loved this salad so much she started making it for herself on a regular basis! :-) That's pretty high praise. Parsley, olive oil, whole grain, and more - what a great tasting, and great looking health food!
[The photo was taken by my friend Elisabeth who also made this bowl of tabbouleh.]

Tabbouleh tastes great served immediately or refrigerated. Leftover tabbouleh should be refrigerated, of course, and eaten up within 4 days or so as it begins to get soggy.  Try adding it to a sandwich in place of lettuce and tomato.  It's really good in a pita bread sandwich, maybe combined with some leftover shishkabob or grilled meat.

Tabbouleh

2 bunches of fresh parsley
2 tablespoons of fresh mint
1 small onion
1 large tomato, diced  (or 2 large Roma tomatoes)
1/2 a small cucumber, diced
1/2 cup bulgur
1 tablespoon salt
1/2 teaspoon allspice
6 tablespoons lemon juice (preferably fresh)
6 tablespoons extra virgin olive oil

Soak bulghur in water for 1 1/2 to 2 hours until soft. (This process can be shortened by using hot water. Just be sure it is cooled before adding to the salad.)  Squeeze out excess water using a metal strainer and your hand.

Wash parsley and discard the stems. Finely chop parsley, onion and mint. This can be done in a food processor very quickly.  (Note: if you do not have fresh mint you may use 1 Tbl. of dry mint.)

Combine all the vegetable ingredients and the bulgur in a large serving bowl. Add the remaining ingredients and mix well. Adjust the lemon juice and salt to taste.

Wednesday, August 1, 2012

Curing Olives


Fresh olives are available to people living in parts of Europe, the Middle East, the southern USA and probably other places.  If you are in the southern US where olive trees are used in landscaping watch for them and ask the owners if you can have the olives when they are ripe.  They'll probably be happy to have them removed so they won’t litter the ground. Keep a record of where you get your olives so that you can go back to the trees that have the best olives.  Some are decidedly better than others!  In some places you can plant your own trees, but be sure to find out about local regulations, as in some places planting is now banned due to the allergy problems.

Sorry to say, I don’t know the source for all of these recipes.  My dad has cured his own olives on numerous occasions and has canned them to make them last longer (see photo).  Some batches have been very good while others were more than some of us could tolerate (usually bitter).  My dad always used a salt brine method for curing.  He may have used vinegar on them when canning.

Method 1

Collect the olives as ripe as possible.  Slash or stamp each olive with the side of a knife or board to make an opening, then soak in cold water in earthenware or glass containers for 10 days, changing the water daily. Soak in a brine solution for 24 hours, then wash off the brine and soak for 24 hours in vinegar. Drain. Store in jars in olive oil. This method will preserve olives indefinitely. (If sourer olives are preferred, add a little vinegar to the oil).

Method 2

Choose red to dark red olives, slash them on one side with a very sharp stainless knife to reduce bruising. Place the olives in any non-metallic container. Make a solution of 1/4 cup salt dissolved in 1 quart water (you will need to increase this for large amounts of olives), and pour enough over the olives to immerse them. Make sure the olives are completely submerged in the solution. Store in a cool place, changing the solution once a week, for three weeks. Any scum that forms on the surface is harmless, just rinse the container and the olives in fresh water if some forms.

Taste one of the largest at the end of three weeks. If only slightly bitter (should still be a bit tangy), pour off the brine and rinse the olives. If still quite bitter, re-brine for another week.

Marinade for Olives (use same container)

1 1/2 cups white vinegar
1 tbs salt dissolved in 2 cups water
1/2 tsp dried oregano
3 lemon wedges
2 cloves garlic

Pour marinade over the olives and float enough olive oil to form a layer 1/4 inch on top. The olives will be ready to eat after sitting in the marinade for a few days. Store in a cool place or in fridge. (Warning:  if kept too long, the lemon and vinegar flavors will predominate, so eat within a month after ready.)

“Dry” Salting Method

Place washed olives in a wicker basket or a plastic container with holes. Cover with medium-coarse salt. Set basket in sun and protect with a cheesecloth cover. Twice a day for a week, toss olives to redistribute them, until the bitter fluid is drawn from them. Bring olives in at night to prevent mold.

Water Method

Cover washed olives with a solution of salt water - 1 cup salt to each quart water - in a crock or glass jar. Place a weight, such as a small plate or washed rock, to keep olives submerged. Olives may remain in this brine for months. Marinate in Olive Marinade before serving.

[editors note: not slashing the olives can result in a strong flavor.]

Strongly Salted Olives

Wash and dry the olives. Place in a container in layers, alternating with dry rock or sea salt, using about 300 grams of salt per kilo of olives. Cover and leave for six months. The salt will extract liquid from the olives, leaving them shriveled. Before eating the olives, rinse in plain water, or soak for a few hours. These olives have a much stronger taste than the first ones.

Thursday, July 28, 2011

History In Food - Mesopotamia


Photo property of The Silk Road Gourmet.

Acts 7:2 And he said, Men, brethren, and fathers, hearken; The God of glory appeared unto our father Abraham, when he was in Mesopotamia, before he dwelt in Charran, 

My family has had an interest in foreign foods for a long time. Here are some interesting recipes that will allow you to eat a little history. The majority are from Mesopotamia, the cradle of civilization, but there are some others as well. (Note: Disclaimer on some ingredients. If you really want to make the recipe, try substituting something that seems like a good alternative.)

From The Silk Road Gourmet:  “The worlds' most ancient recipe collection was actually found on cuneiform tablets from Ancient Ur. These are currently at the Yale Library. Here are some adaptations.” So, here are some recipes that Abram and Sarai might have eaten, more or less, when they lived in Ur of the Chaldeas! How about that? :-)
Lamb with Licorice and Juniper Berries
Lamb and Carob Stew
Roasted Barley and Herb Pilaf
Mersu with Cheese
Mashed Turnips with Herbs
Mersu
Mesopotamian Wildfowl Pie
Leavened Bread
Pork Tenderloin with Licorice

Babylonian Apricot Jewels – I’m not sure why these are called Babylonian. There isn’t much explanation here. But, they look and sound good (with some modification), and apricots are an ancient food in that area.

Date Cookies – Why these Mesopotamian/Iraqi cookies are listed at an Asian site, I am not sure, but here they are, nonetheless.

Mesopotamian Barley, Lentil and Tahini Soup

Cooking Ancient Recipes – This collection includes two other areas of the ancient times as well as Mesopotamia. Just a word of warning: one of the recipes calls for blood. We, as Christians, have been forbidden to eat blood. Acts 15:28 For it seemed good to the Holy Ghost, and to us, to lay upon you no greater burden than these necessary things; 29 That ye abstain from meats offered to idols, and from blood, and from things strangled, and from fornication: from which if ye keep yourselves, ye shall do well. Fare ye well.

I hope you enjoy trying some of these recipes out and learning something about this part of the world that is so important to the history both of the world and of the Bible.

Monday, January 24, 2011

Fast Method Baklava

Here is a recipe for baklava that does not require the tedious method of layering butter and fillo dough sheet by sheet.  This is the only kind I’ve ever made and it always turns out well.  It is a family favorite!

I recommend making the syrup ahead of time, but if you do not remember, be sure to let the baklava cool completely before pouring the warm syrup over it.  Either the syrup or the baklava should be warm, but never both according to what I read.  For large batches of baklava it is recommended to let it cool first and put the warm syrup on later.  I have done it both ways, and they both work.
Some recipes call for unsalted butter, but I’ve used salted most of the time and it tasted fine.  The recipe below is actually a combination of two different recipes.  This is approximately how I made it the last time.
--------------------------------------------
1 pk. of fillo dough (about 20 – 30 sheets)
1 lb. butter, melted and with the solids skimmed off the top
3 - 4 C. ground walnuts (or pecans or unsalted pistachios)
1/2 C. sugar
2 Tbl. melted butter (I just take this out of the amount melted above.)
2 tsp. ground cinnamon
Honey Syrup
Preheat oven to 450F.  Brush 9 x 13 x 2-inch cake pan with butter.  Place half the fillo dough in the pan (about 10-15 sheets).  Spread all of filling mixture evenly over it.  Cover with remaining half of fillo sheets.  Cut into diamond shapes* using a good, sharp knife.  Spoon the melted (or clarified) butter over it making sure to  get it in all the cut lines and around the edges.  NOTE: Do not use the milky stuff in the bottom of the pan – only the clearer, golden colored part that looks like oil.
Bake in 450F oven for 8 minutes.  Turn off the oven and leave the baklava in the oven for 45 more minutes.  Do not open the oven during this time.
Remove from oven and spoon cooled syrup on the hot baklava making sure to cover all areas including around the edges, as with the butter.  It may be necessary to re-cut the baklava before removing it from the pan.
Honey Syrup
2/3 C. honey
1/3 C. sugar
3/4 C. water
Juice from 1 lemon
3 whole cloves
1 cinnamon stick, 3 inches long
Mix honey, sugar, water and spices in saucepan over medium heat.  Bring to a boil.  Add lemon juice and cook for about 15 minutes over medium heat.  Remove from heat and cool completely.  Remove cloves and cinnamon before spooning over baklava.
You may increase or reduce the syrup based on your preferences.
------
*To cut baklava into diamond shapes, cut straight lines across the 9” width of the pan.  Then cut diagonal lines from the end of one horizontal cut to the end of another on the opposite side of the pan going in a straight line.  Here is a link to a page that shows a slightly different cutting pattern, but it’s the same idea, and hopefully it will help.  If you don’t feel confident of this, just cut it in smallish squares. 
The diamond pattern tends to make some rather large pieces, so recently I’ve cut mine into triangles and squares instead.  If you do triangles try not to cut them too small as it can make them hard to handle when you remove them from the pan.
=========================
Note: If you do not have whole cloves or cinnamon, you may put in ground.  The cloves would probably be about 1/4 tsp. and the cinnamon 2 tsp.  This is an estimate since I haven’t done this.  But, it will make your baklava darker.  The point in using it whole is to get the taste without the color.  It’s mostly an appearance thing, I think.
If you want to buy whole cloves or cinnamon but the price at your local grocery is prohibitive, I suggest checking out an Indian grocery store or food shop.  A lot of larger cities have them, and we have gotten whole cloves and cinnamon at such places for much better prices that can usually be found in regular grocery stores.  You may find other herbs and spices that you use cheaper there as well.  Also, if you have an electric coffee grinder, you can easily grind up the whole cloves or cinnamon into powder if you want to later.  Just be sure to clean the grinder well after using it for spices or herbs.  (My mom actually keeps two – one for coffee and one for herbs and such.  She watches for coffee grinders at second hand stores.)