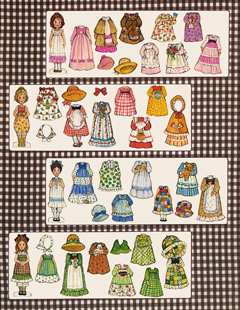
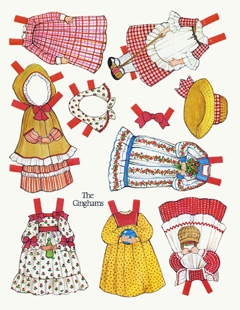
I found these printables of them for free on the internet. Maybe some little girl you know will enjoy them. They would make a cute gift or distraction for a sick or rainy day. :-) The instructions for printing them are at the page.

I found these printables of them for free on the internet. Maybe some little girl you know will enjoy them. They would make a cute gift or distraction for a sick or rainy day. :-) The instructions for printing them are at the page.

Although gift bags are all the fashion these days and are great for reusing, some of us still like wrapped gifts upon occasion. :-) But wrapping paper can be expensive. Here are some ideas for making do or using less expensive methods.
Here are some ideas from "Sister in the Mid-West" at Simple Inspirations:
Among a number of good ideas, she shows an example of writing on paper to decorate it for gift warp. The image above is an example of this that I made some years back. I used my colored Sharpie markers to write "I love you!" in different colors on plain white tissue paper. This was for my husband for our anniversary one year. :-) As she points out in her blog post, you can save paper from packages and reuse paper grocery bags for this as well.
Here are some suggestions:
Wrap a gift for a sewist or crafter in fabric for her to keep.
Wrap bridal shower gifts or a gift for a home maker in kitchen or tea towels.
Wrap a baby shower gift in a light weight fleece blanket.
Wrap a summer birthday gift in a beach towel.
Wrap a house warming gift in a fleece throw or table cloth.
Wrap a set of bed sheets in one of the pillow cases or an extra pillow case.
Wrap various home gifts in a pillow case.
Wrap a kid's birthday gift in a specialty pillow case.
Wrap books in a lap throw (for cozy reading). :-)
These gifts can be held closed with safety pins, ribbon, or low-tack tape that won't ruin the fabrics.

I have made gift bags using old jeans. I used ones that had the hem still intact, but you could use trimmed ratty ones as well. If the jeans are worn too much around the bottom edge try cutting off the hem and washing them to give a frayed edge to work with. Do this before cutting off the legs for the bags. The hem end will be the top edge of the bag.
To make the bags I just cut the bottoms of the legs off below the knee at whatever length I wanted. I turned the pant legs wrong side out and then sewed them shut along the cut edge. Be sure to use a stout needle size for this. Also, it may be difficult to get the machine to sew through the thickest side seam on the jeans. To avoid breaking a needle I used the wheel on the side and gently worked it by hand so that the needle went through slowly and firmly. You could also sew these up by hand if you don't have a sewing machine. Add decorations as you like. In the one in the photo I added a ribbon on one side to tie the bag shut and some "yo-yos" just to pretty it up a bit. You could also paint them with fabric paint.
-------
While I was looking for another photo I found this one of that white tissue gift wrap that I wrote on years ago. :-)
Also, this basket came to me from my mother and she received it as a gift. The lady who gave it to her spray painted it blue, as I recall, to make it fresh. This is another way you can repurpose or re-gift a basket. A little paint can make something look quite new.


JES at Strangers and Pilgrims on Earth shared these nice ideas for decorating our houses with natural things for autumn. Since Thanksgiving is approaching in the U.S. I thought some readers might be interested in some ideas for simple, potentially inexpensive decorations.

JES got her ideas from The Pottery Barn, but she explains how to do them with things that you may have on hand. For the clear vases she recommends canning jars, but you could use clear glass vases if you have them or the clear glass chimney part of an oil lamp or candle. Even glass bowls will work as I did above.
You may also like one of my old posts from the “Shop Your Own Stuff” series about Bringing the Outside In.

Here I used a small pumpkin that I bought and some pine cones. The leaves I used are fake, but if you still have real leaves that are pretty in your area you could collect some for this. You could also cut some out of craft paper or fabric.
Here are two simple and easy ways to make some modern style art for your house. Both methods are quite inexpensive compared to buying regular ready-made art in a store. And since you get to choose your own fabrics, papers, and paints, they will be one-of-a-kind as well.

Photo property of Kelly at The Complete Guide to Imperfect Homemaking
This first one from Kelly at “The Complete Guide to Imperfect Homemaking” uses Styrofoam insulation, heavy fabric, a staple gun (or some similar way to attach it), heavy fabric in a pattern you like or canvas, and some basic picture hanging hardware. Some lighter-weight fabrics would probably work as well. You just don’t want the words on the insulation showing through.
If you have some of these things around your house already (I think we have all of them), it may not cost you anything out-of-pocket. :-) It would be a great way to use up Styrofoam insulation pieces from a home-improvement project.
In the second project she painted on the canvas. One idea to remember is that you can push several canvases together and paint one large picture, then divide it with spaces between when you hang it.
Also, since this is done with Styrofoam insulation, you could use your imagination to add some other items with pins or tacks.
Photo property of Jeni at Becoming Martha
Jeni at “Becoming Martha” made these pretty squares with wood shelving, craft paper, some paint, and picture hanging hardware. She also shows in a second post (here) more of the details of making this and adds some corner holders for 8x10” pictures. With this method you can add your own photos to the art and change them out once in awhile.
-----------
Notice that you could combine these two ideas and make the smaller squares with the Styrofoam insulation. :-)
The process of painting the room took much longer than I expected. It took more primer to cover these mid-tone walls than I expected. That means it also took more work!
The work began with removing a lot of things, taking down blinds and laying plastic to cover the floor. I also covered a few things that we didn’t remove from the room so they wouldn’t get paint on them.
In the above photo you can see a piece of plywood on the floor. This is covering a weak place in the floor which was caused by water damage before we moved in. My husband hoped to repair it before his parents came, but the painting took up too much time, so this part was tabled for “later”.
The window frames and storm windows are removable from the inside, which was helpful. Here you can see that the taping had been started.
I had a new mop head for an old mop that I no longer used much, so I popped it on, sprayed my homemade surface cleaner on it and mopped the walls. :-) I had tried to remove all the nails, but they were hard to see on this paneling, and over time there had been a lot of them put in! Anyway, the mop sponge got kind of torn up, but it did the job.
The room began to look SO much better with just the white primer started!
It took three coats of primer to cover the walls acceptably. All the grooves in the paneling also had to be painted by hand with a brush because the roller didn’t get them well enough. Of course, the edging was done that way as well. Sadly, my taping job wasn’t all that great, so we did end up with some white and blue on the trim. Oh, well. The room was never meant to be perfect what with the stained carpet and damaged floor!
I was very blessed to have a lot of help on this project! A friend of mine gave me a good chunk of help two different days and my mom helped with the brushing in the middle areas during the primer stage. My husband also helped a lot when he was able.
And the paint goes on!
We only had one can of paint and we didn’t want to run out and have to buy more. Another can might not have matched perfectly which would have meant another coat for the entire room. It took at least two coats of paint as it was, and maybe a bit extra in some places. I think I spread it too thin on the first coat. I was being too careful to make it “go far enough” I guess.
In between the painting I worked on other things for the room. Cleaning up some of the décor, printing and framing pictures, and sewing were some of the projects. Here is my dear mom taking a nap in our living room after helping me by pinning the valances I was making for above the windows. :-)
Some things I wanted to get done had to be abandon for the time being because I realized (with my husband’s help) that I didn’t have time or strength before my in-laws came and the important things were the painting and getting the bed set up. Funny thing was that at least one of my ideas turned out to be unnecessary later on. I was able to work around it quite nicely and with much less effort. :-) It is good to not overachieve sometimes, and as Christians it’s good to remember how temporary things of this life are and be content with simpler. I really needed to not be exhausted during my in-laws visit – and thank the Lord, I wasn’t!
I did a lot of looking online trying to find a bed spread, comforter, or quilt for the bed. I’d thought to make my own, but that was way out of reach in such a short timeframe. I concluded that I wanted something not too pricey, not too fancy, not too fluffy and not too light colored. I knew guests would be sitting on it as there isn’t much seating in the room and I didn’t want them to feel like they would soil it or crush it if they did. I ended up buying a very inexpensive one at Wal-Mart that should serve fine for a guest room that isn’t heavily used. I also decided I should look for something that I would like to use in our bedroom or the living room if I want to make a quilt for the guest room later. The one I ended up getting happily fits all the requirements. I feel like the Lord helped me with that. And, my husband was probably glad I settled for something “cheap, pretty and good”. :-) (Sorry, no picture at this point. Can’t spoil the surprise.)
My sister-in-law helped take the tape down the day after the paint was all done and then another day she helped set up furniture. The two of us got quite a bit done. We got the bedframe from a storage shed, cleaned it and set it up, and collected other furniture and tried out some different options.
The footboard that I was going to convert into a headboard didn’t work out because the paint had been damaged and also the knobs for the posts had been lost. :-P (My husband said he may be able to fix it up at a later date.) My sister-in-law said we should attach a board where the headboard would have attached to keep the metal from rubbing the wall. I think I was the one who suggested rolling it in an old bed sheet we’d used as a drop cloth for further protection. It worked out great as you can see in the picture. :-)
I know I’ve just tantalized you with this post, so please come back for Part 3 to see the results! :-)
Coasters are a good item to have in areas where you entertain guests as well as for regular use by your own household. They can save your furniture from water spots, or just keep that little mess off of surfaces that are not damageable. This saves you a little bit of work, especially with coaster that can be tossed into the wash when they need to be cleaned.
These tea cup coasters are so pretty and they look like they are easy to make. Here is the tutorial from Stephanie at The Enchanting Rose:

These would be quite versatile. You can make them “your own” by using fabric and trims that fit your décor and style. Wouldn’t they be cute in red with white polka dots and a bit of white rick-rack? I leave you to your imagination. :-)
Note: If you drink a lot of tea in your house, you may want to use a dark color that will camouflage tea stains. Tea can be hard to get out of fabric. In fact, tea can be used as a fabric dye.
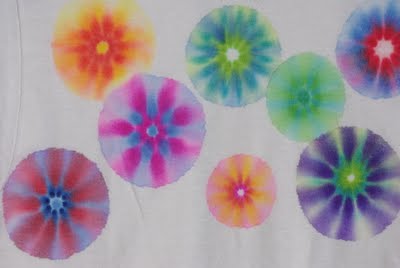
Here are some home décor items you can make, possibly with things you already have on hand. Most of these could be made with your kids as well and some are appropriate for even young children.
Book Page Pumpkin Tutorial by Kara at “Creations by Kara”.
Here is a cute way to recycle or upcycle a book you don’t want any more. Turn it into a pumpkin. If you don’t have orange spray paint be creative. Let one of the kids color the page edges with an orange crayon or chalk, or do it yourself.
These Newspaper Leaves over at “Life with Little Ones” are a simple project that would be fun with children. You don’t have to use newspaper. White or light colored, light weight paper could work just as well. If you’re careful you might recycle pages from an old phone book or something of a more similar weight to newspaper.
Here are some leaf rubbings that my sister-in-law in Australia made some years ago. As you can see, she made them on plain white paper. This makes me think – you could frame “artwork” like this. Do the various leaves in different fall colors for more pop.
Photo property of Spark & Chemistry
Now this is a project that I really want to make! I might make it non-seasonal by using green leaves or some other translucent covering, though I really like the autumn leaves. Maybe some interesting fabric scraps?
Autumn Leaf, Mason Jar Candle Holder over at Spark & Chemistry by Alicia and Geneane
It’s time for another Cheap, Pretty and Good post. Really this is long overdue, but it’s not a high priority here so…enjoy while you can. :-) All of these crafts are easy enough for kids to do, so they would make nice craft or art projects.
[Disclaimer on all sources, as usual.]
Here is a tutorial over at “Cake.” for a cute garland made with paper doilies. It would be fairly easing to add letters and make a “Happy Birthday” banner, I think. Either way, it will dress up a party without costing too much. (It seems to me that you could use real doilies to make this as well if you have a pile that you don’t know what to do with. You might want to sew them in place with a few stitches and use some pretty ribbon instead of yarn.)
DIY Doily Garland by stephlovesben
With the leftover paper doilies you might like to make these paper roses over at “paper, plate, and plane”:
No Fuss Paper Roses by Jeromina Juan
I think they also look like peony tulips.
(Note: Keep an eye open for paper doilies in February, especially the red ones.)
At “Oh Happy Day” is a tutorial for some simple paper calla lilies.
Paper Calla Lilies DIY by Jordan Ferney
If you’re a paper crafter this could be a nice way to use up scraps. They could be done with inexpensive colored paper of any sort.
Hope you enjoy this little post.