Hello and welcome!

Welcome!
This blog is an extension of The Home Maker's Corner. Regarding use of content: please see "the fine print" at the bottom of this page.

Showing posts with label home improvement. Show all posts

Tuesday, December 21, 2021

Tips for Decluttering when You Are Emotionally Exhausted from Dana White


Here are some helpful pointers on how to deal with areas that need help even when you feel emotionally exhausted. Life has been "too much" on so many levels the last couple years that it can make us freeze up on things we see as non-essential. But, over time that can mean that cluttered or problem areas can get out of control and just add to our stress. These tips can help us at least make progress without making emotional decisions.


I have no control over ads or suggested videos.

Tuesday, July 21, 2020

Regrowing Vegetables from Kitchen Scraps


Here is video showing how you can grow new food from vegetable trimmings. If you don't have a garden to plant the things in later after they root and sprout, you can plant most of them in pots. The pots would need to be large. For potatoes you would need something quite large since they are going to grow under the surface and will need plenty of room.

I do not know this lady, but she lives in the same part of the US as we do. Her aprons are a fun addition. :-)


I have no control over ads or suggested videos.

Friday, October 12, 2018

Sew Happy Friday - Prairie Point Table Runner Tutorial


Here is a fun, easy table runner made from 5" squares (charm squares). This could be a fun way to use up complimenting scraps or to add a pop of color to your home with a favorite charm square collection. (Don't forget that it is easy to cut 10" squares into quarters to make 5" charms.)

This runner finishes quite long at 52 inches, so if that is too large for your table you can shorten it by reducing the number of horizontal squares from 11 to whatever you need it to be. You could also use 4" squares instead in this case because the instructions wouldn't change, just the measurements. You may have to arrange the prairie points a little differently, though, to get them even.

When closing the opening left for turning the runner, Donna just stitched it shut on her sewing machine leaving a visible thread line. This can be made to look more a part of the overall design if you top stitch around the entire runner making sure that the opening on the bottom is closed as you do so. I think this will also provide extra security for the prairie points.

Friday, February 23, 2018

Sew Happy Friday - A Tutorial for Pretty Valances


Image property of sew4home.com

Here is a tutorial over at sew4home for some pretty valances with a lace inset. They also put a few rows of decorative stitching on them, but if your machine doesn't have decorative stitches, this is optional. The valances would still be very nice without them. If you do have decorative stitches on your machine and you haven't tried them out, this might the project to use one of them. :-) You could also sew on ribbon instead.

Home made valances and curtains can add a lot of color or personality to a room since you can use fabrics that would never be used in pre-manufactured types. I've made quite a few over the years. Some for myself, but also some for my siblings. In a room where there are Venetian blinds, and cheerful valance can really make in look more cheerful and homey (homely - of you're British).

Link:  Lace & Decorative Window Valances

Friday, October 13, 2017

Cheap, Pretty, and Good - Tea Cup Candles


Do you have some cute or pretty tea cups you inherited that aren't worth all that much and you don't know what to do with them? Let's face it, some tea cups are pretty, but they aren't necessarily worth much, and if you don't use them or you have too many, they can become clutter. This tutorial shows how to make them into pretty candles so that they can actually serve a useful purpose and add ambiance to your home as well.


Photograph property of Rhiannon Bosse.


I know, someone will probably object to this, saying that tea cups ought not to be "ruined" this way. Well, there are a lot of china tea cups floating around second hand stores because someone didn't have any use for them and donated them. If someone can find a use for their grandmother's tea cups as candles, why not? And, the tea cups don't necessarily have to be ruined by this usage either. Oh, another thought - these would make cute gifts too, and if you don't have tea cups, you could probably find some at the second hand shops I mentioned. :-)

Also, note that these candles could be useful during a power outage since they are easy to carry.

NOTE: Do not use plastic or melamine tea cups for this project!

Friday, June 30, 2017

Sew Happy Friday - Patchwork Shower Curtain


Photo property of Better Homes and Gardens

Here are the instructions for this pretty patchwork shower curtain. This would be a great way to add color to a dull bathroom. Also, the curtain without the plastic shower liner could be used for a light weight, colorful curtain at a sliding glass door or large window. (You would need to adjust the size appropriately.) By the way, this would be a nice way to use up some larger scraps of fabric leftover from other projects.

GO HERE for instructions.

Friday, October 14, 2016

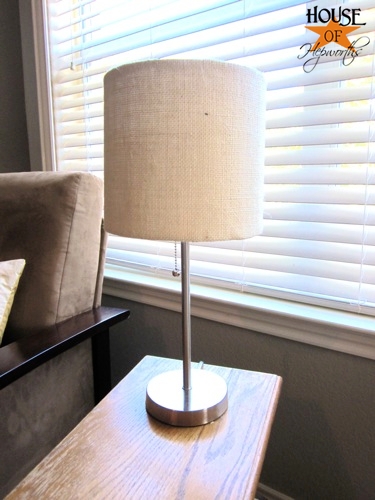
Cheap, Pretty, and Good - Tutorial for Recovering A Lamp Shade


Here is a tutorial from The House of Hepworths blog showing how to make a tired lamp shade over again.  I thought it could be quite useful, and it could save some money as well.  I haven't had an opportunity to used this method yet, but I might at some point.

How to Recover A Lamp Shade


Friday, July 31, 2015

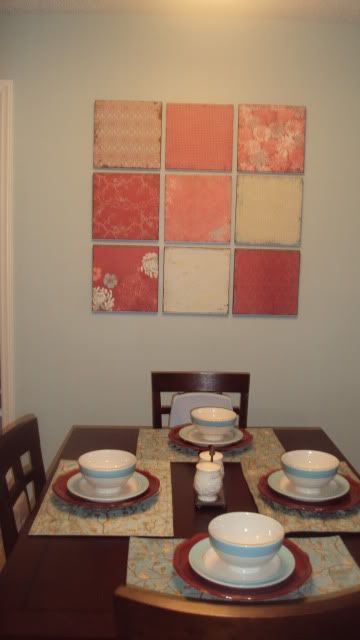
Cheap, Pretty and Good – DIY Art for Your House


Here are two simple and easy ways to make some modern style art for your house.  Both methods are quite inexpensive compared to buying regular ready-made art in a store.  And since you get to choose your own fabrics, papers, and paints, they will be one-of-a-kind as well.


Photo property of Kelly at The Complete Guide to Imperfect Homemaking

Simple, Thrifty DIY Art

This first one from Kelly at “The Complete Guide to Imperfect Homemaking” uses Styrofoam insulation, heavy fabric, a staple gun (or some similar way to attach it), heavy fabric in a pattern you like or canvas, and some basic picture hanging hardware.  Some lighter-weight fabrics would probably work as well.  You just don’t want the words on the insulation showing through.

If you have some of these things around your house already (I think we have all of them), it may not cost you anything out-of-pocket. :-)  It would be a great way to use up Styrofoam insulation pieces from a home-improvement project.

In the second project she painted on the canvas.  One idea to remember is that you can push several canvases together and paint one large picture, then divide it with spaces between when you hang it.

Also, since this is done with Styrofoam insulation, you could use your imagination to add some other items with pins or tacks.


Photo property of Jeni at Becoming Martha

Easy Art Blocks

Jeni at “Becoming Martha” made these pretty squares with wood shelving, craft paper, some paint, and picture hanging hardware.  She also shows in a second post (here) more of the details of making this and adds some corner holders for 8x10” pictures.  With this method you can add your own photos to the art and change them out once in awhile.

-----------

Notice that you could combine these two ideas and make the smaller squares with the Styrofoam insulation. :-)

Tuesday, July 28, 2015

Our Guest Room Do-Over, Part 3: The (almost) Finished Room!


This Part 3 of how we fixed up our guest room.  See Part 1 and Part 2.

Ecclesiastes 7:8  Better is the end of a thing than the beginning thereof…

We got it done in time for my in-laws visit!  Well, almost done. :-)  I still have things that I want to make or change.  Also, since the paint was barely dry, I didn’t hang much on the walls.  I think the lady at the store told me it would take about a month for it to dry good and hard, especially since we were painting on paneling.

My husband and I picked up the mattress and box spring at Costco on a Friday and stored them in our dining room till we were ready for them.  My neighbor sister-in-law helped me on the following Tuesday with setting it up and arranging the furniture.  We had it set up like this (below) at first because we thought it shouldn’t be on the board covering the weak spot in the floor on the opposite side (mentioned in the last post).  But, I didn’t like the head of the bed against the windows, and it wouldn’t fit with the all the furniture against the other windows.

You can see here that the blinds and valances were not all up yet as well.

My mom came over to look and mentioned that they had had their bed on the opposite wall where the board was.  This made me think, so I measured the bookcase and decided that it would all fit if we flipped the lay out.  My husband confirmed that it was perfectly safe to put the bed on the plywood board, so he and I rearranged it that evening.  He also got the fixtures up for the window treatments.

The next day, the day my in-laws were to arrive, I did the finishing touches.  Here are the results.

I really like the pale aqua paint!  It’s such a soft color that it doesn’t photograph really well, but you can see it in the pictures where I used a flash.  It is a lovely cool color for this Texas climate, I think!

The bed, the “quilt”, and bed skirt were purchased.  We already had pillows and sheets.  Two of the blinds were really shabby, but we had practically new ones in the garage which we were able to install after buying some new brackets.

The “Welcome” picture (see top photo) was created from one of my own photos.  I Photo Shopped it to match the salmon pink in the room and make it look a bit more artsy.

The bookcase was a long-term loan from my sister-in-law who was storing it in our garage. :-) 

I love the way the evening sun shines into this room.

Most of the décor on the bookcase was “shopped from our own stuff”.  The ‘50s items came from my dad – an aluminum cup (perfect shade of pink) made into a vase with a bit of tulle, the pink pottery dish and the three oval serving dishes.  The oval serving dishes were the perfect colors for the room, so I stacked all three.  I put some packages of snacks in them in case my in-laws felt snack-ish at night or early in the morning.

Since my in-laws will be using this room the most and since they and my own parents were all missionaries in Africa, I put in some African touches as well.  The painting and wood carving on the top are from East Africa. [Painting: Lake Nakuru]  I had wanted to line the back of the top two sections with fabric for more color interest, but the painting was so large I decided it was enough.

The framed Bible verses were made in Photo Shop with vintage graphics I found free online.  We did buy the picture frames.  The candle holder and feathers came from other areas of our house. (The candle is artificial – LED, so no worries about fire or damage to the bookshelves.)  I still need to select and add more books from my dad’s overflow collection in our garage. :-)  The trash can was also donated by my sis-in-law.

From the three storage tubs that were in here originally, I picked out the one that best complimented the décor.  I hope to make a cushion to put on top for more comfortable seating.  The painting is another African scene from my parents.  [Painting: Tana River]

The “bed side table” is actually an old T.V. console my parents gave us.  Hopefully at some point it will be replaced with something that takes up less space.  It’s a bit too wide in that spot.  I didn’t put anything on it yet other than a coaster because I thought that might be the best spot for a suitcase at this point.

The smaller nightstand by the door was another donation from my sis-in-law.  The light was discarded by my parents.

As you can see there is no headboard at this point.  As mentioned before, my husband said he might be able to fix up a metal footboard we have, but that may take some time.  We’ll see.  It isn’t necessary.

I’m not sure yet what I’m going to put on this wall.  I’m still thinking I might install a “quilting wall”, but just try to make what’s on it attractive when we have guests.  It would need to be a more finished and nice looking one, if I do that.  The old tablecloth method probably wouldn’t look so great in this room now. ;-)

The valances were made with a combination of fabrics.  The solid and floral came from my stash.  The solid was a “mistake” order – wrong color.  The floral stripe was a strip from a “jellyroll”.  The Swiss dot was purchased for this room.  I had to really pay attention when I was putting them together to make sure that the polka dot sections were on the outside of each set. :-)

Well, that’s it for now.  I may try to do an update later if/when I get some more things done in the room.  I still have ideas of things I’d like to add, change or do.  My in-laws really liked it, but the best part was probably that they slept really well on that bed!  That made us all happy. :-)

Tuesday, July 21, 2015

Our Guest Room Do-over, Part 2 – In the Process


See Part 1 here.

The process of painting the room took much longer than I expected.  It took more primer to cover these mid-tone walls than I expected.  That means it also took more work!

The work began with removing a lot of things, taking down blinds and laying plastic to cover the floor.  I also covered a few things that we didn’t remove from the room so they wouldn’t get paint on them.

In the above photo you can see a piece of plywood on the floor.  This is covering a weak place in the floor which was caused by water damage before we moved in.  My husband hoped to repair it before his parents came, but the painting took up too much time, so this part was tabled for “later”.

The window frames and storm windows are removable from the inside, which was helpful.  Here you can see that the taping had been started.

I had a new mop head for an old mop that I no longer used much, so I popped it on, sprayed my homemade surface cleaner on it and mopped the walls. :-)  I had tried to remove all the nails, but they were hard to see on this paneling, and over time there had been a lot of them put in!  Anyway, the mop sponge got kind of torn up, but it did the job.

The room began to look SO much better with just the white primer started!

It took three coats of primer to cover the walls acceptably.  All the grooves in the paneling also had to be painted by hand with a brush because the roller didn’t get them well enough.  Of course, the edging was done that way as well.  Sadly, my taping job wasn’t all that great, so we did end up with some white and blue on the trim.  Oh, well.  The room was never meant to be perfect what with the stained carpet and damaged floor!

I was very blessed to have a lot of help on this project!  A friend of mine gave me a good chunk of help two different days and my mom helped with the brushing in the middle areas during the primer stage.  My husband also helped a lot when he was able.

And the paint goes on!

We only had one can of paint and we didn’t want to run out and have to buy more.  Another can might not have matched perfectly which would have meant another coat for the entire room.  It took at least two coats of paint as it was, and maybe a bit extra in some places. I think I spread it too thin on the first coat.  I was being too careful to make it “go far enough” I guess.

In between the painting I worked on other things for the room.  Cleaning up some of the décor, printing and framing pictures, and sewing were some of the projects.  Here is my dear mom taking a nap in our living room after helping me by pinning the valances I was making for above the windows. :-)

Some things I wanted to get done had to be abandon for the time being because I realized (with my husband’s help) that I didn’t have time or strength before my in-laws came and the important things were the painting and getting the bed set up.  Funny thing was that at least one of my ideas turned out to be unnecessary later on.  I was able to work around it quite nicely and with much less effort. :-)  It is good to not overachieve sometimes, and as Christians it’s good to remember how temporary things of this life are and be content with simpler.  I really needed to not be exhausted during my in-laws visit – and thank the Lord, I wasn’t!

I did a lot of looking online trying to find a bed spread, comforter, or quilt for the bed.  I’d thought to make my own, but that was way out of reach in such a short timeframe.  I concluded that I wanted something not too pricey, not too fancy, not too fluffy and not too light colored.  I knew guests would be sitting on it as there isn’t much seating in the room and I didn’t want them to feel like they would soil it or crush it if they did.  I ended up buying a very inexpensive one at Wal-Mart that should serve fine for a guest room that isn’t heavily used.  I also decided I should look for something that I would like to use in our bedroom or the living room if I want to make a quilt for the guest room later.  The one I ended up getting happily fits all the requirements.  I  feel like the Lord helped me with that.  And, my husband was probably glad I settled for something “cheap, pretty and good”. :-)  (Sorry, no picture at this point.  Can’t spoil the surprise.)

My sister-in-law helped take the tape down the day after the paint was all done and then another day she helped set up furniture.  The two of us got quite a bit done.  We got the bedframe from a storage shed, cleaned it and set it up, and collected other furniture and tried out some different options. 

The footboard that I was going to convert into a headboard didn’t work out because the paint had been damaged and also the knobs for the posts had been lost. :-P  (My husband said he may be able to fix it up at a later date.)  My sister-in-law said we should attach a board where the headboard would have attached to keep the metal from rubbing the wall.  I think I was the one who suggested rolling it in an old bed sheet we’d used as a drop cloth for further protection.  It worked out great as you can see in the picture. :-)

I know I’ve just tantalized you with this post, so please come back for Part 3 to see the results! :-)

Tuesday, July 14, 2015

Our Guest Room Do-over – Part 1


Our guest room has been either a mess or mostly empty ever since we moved into this house.  At first it was used as a dumping place for things I didn’t know what to do with, or wasn’t using at the moment. 

When my in-laws came to visit and stay here a few days, we did a massive clean up and got it presentable, but the accommodations were very sparse.  (My brother and sister-in-law also spent a couple nights in here when their 5th wheel was being worked on.)

I used the room for sorting stuff between visits and then would have to clean it up whenever my in-laws came, at least to the point where we could set up an air mattress.  We set up a double layer, queen-size air mattress when we had overnight guests. 

It worked out OK for a few years and my in-laws were fine with it for awhile.  But then, last winter when they were here the wrong mattress was set up and they didn’t sleep well at all.  They said maybe they would stay at a motel the next time they came. 

I felt really bad, and so it occurred to me that it might be a good time to really fix the room up and get a real bed!  I wanted them to know they are welcome in our home and that we want them to come and visit, especially since I have been unable to travel to their home for a few years now.  My husband was onboard, and we could afford to do it at this point, so we began to make plans.

My Inspiration

A new housing development is going in “up the road a piece” from us.  They are building large, fancy houses, and when my in-laws were here to visit last January my mother-in-law wanted to stop in and look at the model homes that are open to the public.  It was a fun little sidetrack “just because we could”. :-)  These houses were definitely out of our league!  I would feel very uncomfortable living in anything so grand.  But, in one of the houses I saw a room that I REALLY LIKED.

I loved this pale blue color because it felt so airy and light.  It made me feel like I was up in a high open space.  If fresh air had a color, this would be it, especially near a fresh water lake. :-)

(By the way, this was a secondary bedroom, not the master suite in this luxury home!  Also, although this room was my inspiration, anyone who has spent much time on this blog or The Home Maker’s Corner should know that my style is not exactly “chic”.  :-)  My husband says my style is “eclectic cottage”.)

I got to wondering if I’d like this color in my own bedroom “if we build our own house someday”.  But, blue can be depressing to me, so I wasn’t sure.  When I started thinking about re-doing the guest room, it occurred to me that we could paint it this color so that I could see how it looked in a more “normal” house and decide if I liked it.  After getting some paint chips at a couple stores we headed over one day to see if we could match it, and we did.  It turned out to be a pale shade of aqua.

We bought our paint and primer and some odds and ends for the job and were planning to start on it “soon”.  Then my in-laws let us know they were planning to come for my husband’s birthday in June.  I don’t remember exactly when they told us this, but it seemed doable to me at the time, so we decided to try to get it done before they came.

I’d already decided to try to “shop our own stuff” on this project as much as I could, and had been making a mental inventory of things I could use in the room.  My sister-in-law offered a queen size bed frame she had, and my dad let me have some of his 1950s collection that he was planning to get rid of.  So, it wasn’t like we were starting with just paint.

This is what our guest room looked like when we started.  I may have removed a few things already before I took these.  I can’t remember now.

It was a real hodgepodge of stuff, but not nearly as bad as those first pictures at the top which were taken around 2009 or ‘10.  It definitely needed a lot of help, though!

--------------------------

Due to the size of this project, I’m breaking it up into parts.  Stay tuned for more installments! :-)

Part 2 – In the Process

Tuesday, March 3, 2015

Monthly Challenge - March


(An old photo of me cleaning our fridge when we first moved to Texas.)

If you don’t know what the challenges are about, please read the first one. :-)

I had written up a different challenge for this month, but then realized that the northern regions of the globe would maybe be too wintry still for it to practical, so I had to figure out something else.  I postponed the other challenge to April, so that little hint should keep you guessing. :-)

Since it’s March and “Spring Cleaning” is popular with some people, I thought this challenge might be a good one for us to do this month.

-----------------------------

Clean something that you know needs to be done, but you have been putting off.

And/Or

Get rid of 5 things you don’t really need or never use.

-----------------------------

Even if you don’t practice “Spring Cleaning” (which I don’t) this challenge is doable.  A lot of us have some cleaning job that is nagging us that we could get done this month.  I can think of more than one at the moment.  It doesn’t have to be something huge and exhausting.  You don’t have to clean out the whole garage.  Pick something for which you have the time and energy.  Ideas:  Clean the fan blades of ceiling fans in one or more rooms, clean the top of the fridge, wash a load of rags that have been waiting to get done, clean out the bath tub you never use, etc.  Cleaning and getting rid of 5 things could easily be combined in some cases such as cleaning out the fridge.

On the other hand, if you’re not up for a cleaning project at all, you can get rid of 5 things you don’t need, want or use.  That should be fairly easy for anyone, except maybe a pathological hoarder.  (If you feel too overwhelmed by the thought of getting rid of 5 things, and assuming you’re not a minimalist, you might want to seek professional help.  Seriously.)  Some areas to look: clothes closets, storage areas, cleaning supplies, the freezer or deep freeze, shoes, book shelves, seasonal décor, toy boxes, craft/sewing area, etc.

I’m thinking that it probably would be good for me us, if I did both of these challenges this month!  Since some of these challenges are meant to improve our own personal spaces, naturally it can improve things for those around us as well. :-)


The Enchanting Rose

Tuesday, November 11, 2014

Reader’s Comments – Why Do Americans Decorate for the Seasons?


I thought it might be interesting to address some reader’s comments in posts, so I’m going to start a new series.  Some of these may come from email from the Home Maker’s Corner, but I think most will be comments made here at the blog.

------------------------------

A year ago Joluise made a comment on my post “A Reminder for this Time of Year”.  In response to my answer she said this:

“I read a number of Christian blogs and I am fascinated by the number who "decorate" their homes for Fall. We just don't do that and find it all very strange. A number of blogs have had photos of pumpkins in all the house and decorations on their mantelpieces. I wouldn't even think of decorating for spring right now!!”

I don’t know if this custom came from other European countries or not.  I know Australia has had primarily a British influence.  I haven’t researched this subject, so take this as my opinion and observations.

First off, both the U.S. and Canada have a historical Thanksgiving Day to celebrate the harvest.  This particular holiday happening in the autumn, which is unusually beautiful in parts of North America, lends itself to decorating with the gorgeous foliage and produce of the season as well as things associated with the first Thanksgiving in the U.S. – leaves, pumpkins, Indian corn, squash, apples, grapes, acorns, etc.  Summers in North America can be long and hot in some parts, so autumn is also a welcomed relief from the heat – something worth celebrating.  Also, since school starts at the end of the summer, autumn offers the first big seasonal “craft project” opportunity for the kids.  Often these projects are items to be used for décor.

Sadly, Halloween has been built into one of the biggest holidays in the U.S.  I can’t exactly say how this happened, but due to its overtly devilish connections I’m sure that Satan has made much of the opportunity to encourage it in many ways.  The longish time period between July 4th (Independence Day) and October 31st without any significant decorating holidays, has probably contributed to people’s “need” to make it big in the U.S.

In addition, much of the U.S. and Canada have very distinct seasons.  Winter is long and dark and cold in many areas so spring is anticipated eagerly, and in some parts of the continent spring is spectacular.  When the flowers appear it’s a natural tendency to bring some inside – daffodils, tulips, pussywillows, apple blossoms, dogwood, redbud, etc.  In fact, some of the tree blossoms can be cut and brought inside to bloom early.

The spring observance of the Lord’s resurrection, which has very sadly been combined with ancient European and Middle Eastern fertility cults and so named Easter, naturally lends itself to certain springtime decorations being used since it occurs at that time of year.  May baskets, a former custom brought from the Old World, I believe, were given in some parts of the American continent at one time.

Of course, the usual decorations for the Christmas season have been around for ages and came from the Old World, again much of it dating from ancient times and other religions.  In the very early years it was not observed much or at all in parts of the U.S., and only became a huge holiday later on.  The usual firs, pine, spruce and holly were available here, but there were also other things such as bittersweet vine and cranberries which were late autumn items that could be stretched into December.

Now, I believe that one reason decorating for the seasons has become such a big deal is that the commercial world has capitalized on the already existing tendencies or interest.  The manufacturers of goods have come up with a massive array of artificial decorations and many different products.  Gardening stores, food markets and florists have offered a variety of real plants, foods, vegetables, fruits and flowers.  Seasonal sales have become a big, big deal for them all.  It is very profitable, and every year there are a number of holidays and seasons that can be used to promote sales.  In short, it’s a huge money making opportunity for them.  In somewhat more recent times Halloween, Independence Day (July 4th), Valentine’s Day, St. Patrick’s Day, and perhaps other days have been built into more than they originally were as well.  Pushing the “seasonal décor” relating to these holidays, in addition to the others, has increased the profits of sellers and increased the amount of purchasing and decorating being done.

It has not been that difficult to convince a willing market to increase their spending and decorating habits in relation to the seasons.  In addition to the increased advertising, DIY and crafting sources (shows, web pages, catalogs, etc.) and decorating experts have added to the “need” for seasonal décor.  They have introduced a vast array of “possibilities” and often offered products from “sponsors” to make the projects easier.  If you want to you can now redecorate your entire house for some holidays or seasons such as Christmas and autumn.  Basically it’s very clever marketing, and it works or they wouldn’t do it.

So, I guess the short answer would be that our distinct and beautiful seasons combined with the holidays being pushed and promoted by sellers of goods has resulted in a tendency of many to over-do things as far as decorating for the seasons is concerned.

For my own part, I don’t object to some modest changes of décor for the seasons.  I enjoy it and would probably bring in natural things more if I could or needed to.  As it is, I do some seasonal decorating, but mostly in one place – the dining room, and mostly on the buffet and table there. 

Fall and spring tend to be my favorites for changing up the décor, but I also have a collection of snow themed items that I use most years in the winter.  Summer is a long season here in Texas, so what I put out then stays the longest I think; and perhaps our fewer real seasons here is one reason I like to decorate a little inside.  I have pretty much limited myself to one large storage tub for my seasonal items.  Except for the natural things I sometimes use (pumpkins, squash, flowers, etc.), I store most of the items I use in that tub and try not to accumulate more than that.  I probably need to “delete” a few items.

I don’t mind changing the few items on the buffet and table, and the table sometimes gets changed randomly (a different table cloth or placemats for whatever reason).  Some few of the items are year round items that stay in the mix anyway, or can if I want them to. :-)  Some things just get moved from their normal spot to the buffet for the season so it is more rearranging those items.

My spring décor on the buffet a few years back.
The rabbit pitcher and strawberries are “regulars” in my décor elsewhere, I just moved them for the season.  Also, I’d been thinking I wanted some artificial daffodils for spring, but I didn’t buy them right away and I was so glad I didn’t because I found these with the hyacinths(?) later in a box in the garage.  I’d forgotten I had them they’d been packed up so long.  So, I got to “shop my own stuff”. :-)

My Fall décor a year or two ago.
Yes that is a rug on the right.  We got it for fifty cents at a yard sale. :-)  The beautiful doily was made by my Gramma Hoover and is a “regular” there.  I’m thinking the cat tails need to be “deleted”.

And some winter décor.
As you can see, the blue basket gets used a lot.  It isn’t always out, but I find it very versatile.  Also, the verse with the kookaburra stays all the time.  It was made for me by my Aussie sister-in-law and it goes with anything really.  The snowmen are sitting on quilt batting, in case you wondered and the poinsettia is artificial too.  I think I got it marked way down at the end of the season one year. :-)

My dining room table one year at Thanksgiving.
The “runner” is just two placemats. :-)
The leaves are artificial and were snipped from a “bush”.
I saved seeds from the little squash and my dad grew some the next couple years.

Tuesday, July 22, 2014

Update On Getting Rid of 365 Things


You may recall that this year I challenged myself (and anyone who wanted to join me) to get rid of 365 things.  I’ve kept working on that goal even though I’ve failed at posting any further updates till now. :-) 

For some reason, I started at 365 and have been counting down.  I think it would have been easier to count up, but - Oh well.  I started this week at 141 things left to get rid of.  Since there are 162 days left this year I’m ahead of schedule, which is very gratifying.  Plus it gives me a buffer for weeks when I might not be able to make much progress.  If I’d counted every item individually I’m sure I would have been past my goal by now.  But, I was intentionally under counting some things in order to make it harder on myself and more effective.

The worst weeks were two different weeks when I only managed to get rid of one item.  I think I was sick part of one of those weeks and the other one was the week we tried to go on vacation.  (I say “tried” because we ended up coming home early.  Long story.)  The best week so far was a few weeks ago when I got rid of 27 things!  That was satisfying indeed.  I also had two different weeks in which I discarded 24 items. That really helped me catch up.

Just for interest I’ll list some items here that I’ve either thrown away or donated (or will be donating).  These are not necessarily the total amounts of these items I’ve gotten rid of.  I haven’t added up totals for categories (as yet) and maybe won’t.  These are just numbers taken from random weeks – in other words, I got rid of this number of whatever it is in one week – not all total.  I hope that makes sense.

1 sun catcher
1 spice carousel (in the way and seldom used)
1 bag of orange peels (from the fridge. They were being saved for making candied orange peels, but I realized it wasn’t going to happen and gave myself permission to throw them away, and to count them. ;-)
1 bed skirt
1 bed coverlet
2 packages of trim (sewing type trim)
1 jug fancy fabric scraps
1 tea kettle
1 old garden hose segment with sprinkler attached (Yeah. That was sitting out in one of the gardens. What? Don’t ask.)
1 bag candy :-)
1 catalogue (Well, it was a quilting catalogue that I especially liked – Hancock’s of Paducah – and I wanted to keep it!)
3 shirts
1 string (It was a string of considerable substance and color and it hadn’t been used in all the time it was stored and it was cut in an unlikely segment.  Huh.  Sorry, some of you just won’t understand that.  I think it’s a genetic thing. :-)
1 container of old feta cheese (Because it was given to me and I kept thinking I’d use it, but it was getting strong and a little weird and finally I just decided to pitch it.)
1 computer chair
4 garments
1 corn syrup (Found on its side in the back of the pantry. It had leaked. Ugh.)
1 dead plant (don’t ask – Not donated, don’t worry.)
1 package stale pancake mix (It was given to us, but my husband makes them from scratch.  What can I say?)
1 frying pan
"1 useless gadget" (That’s actually what I wrote in my record. I don’t even know what it was. LOL)
12+ various food items (things I wasn’t going to use)
1 item décor
6 jars old food (These were mostly things my family has been carrying around for years that ended up in my store room.  They were old.  Yes, they should have been used, but that’s how it goes sometimes when you home can food and can’t stand to use it up too quickly, but don’t use it quickly enough.  Blah.  I want to try to break that trend for my own part. :-)
1 plastic container
2 batches of bows (See photo below.  Confession time – I have a weakness for gift bows.  I use them on both wrapped packages and on gift bags.  Well, I didn’t really know how many I had until I decided to sort and reduce the gift wrap collection which involved more than one box.  Ahem!  I realized I have a problem that has to stop!  Yeeps. :-o)

These photos in this post were taken on my cell phone, hence the poor quality.

So, this is my mid-year update on this challenge.  There may not be another one till the end of the year.  We’ll see.  If you want to tell us about your efforts please leave a message.  If you’ve blogged about it yourself leave a link too, please.

Tuesday, March 18, 2014

Laying Aside Weights – Some Thoughts On Dealing with Things


1 Corinthians 7:29-31  But this I say, brethren, the time is short: it remaineth, that both they that have wives be as though they had none; And they that weep, as though they wept not; and they that rejoice, as though they rejoiced not; and they that buy, as though they possessed not; And they that use this world, as not abusing it: for the fashion of this world passeth away.

These articles written by others go well with the Laying Aside Weights series. (I know, I thought I was done with that too, but it keeps coming up again.)

Spring Cleaning Your House and Your Mind - Here’s an article over at Living On A Dime about clearing our thinking up as we prepare to clean up our houses for spring and summer.  I dare say most of us could stand to remove some of the “scum of life” that has accumulated from the winter months.  She has some helpful observations about how we view our things and how our things should serve us rather than us serving our things.  (If you have trouble figuring out how to go about organizing and cleaning up – especially if you have some illness that hinders you – you might want to also read this:  How to Get Organized! Part 2.)

Letting Go of Someone Else’s Memories - Here is a thought-provoking item at A Slob Comes Clean for those who are tempted to keep and store other people’s memories and stuff.  I may have posted this before, but it goes well here.

Saturday, March 8, 2014

Sew Happy Saturday–Testing Fabric In A Room


Sometimes it can be hard to decide if you want a certain color or print in a room.  Like paint and wallpaper, you can add a sample of fabric for awhile to see how you like it.

When I was re-covering my nap time pillow with the white poinsettia fabric (see previous Saturday post) I considered re-covering another sofa cushion in the living room with the half yard I had left.  But, I wasn’t quite sure if I wanted more of that fabric in the living room, so I decided to do a test.

I wrapped the extra fabric round the pillow I was thinking of covering and left it there for awhile.  I looked at it in different lights and just considered it for atmosphere and pop.  I even took pictures, which helped me to see it from a “distance”. 

It looked clean and a little more modern.  It matched the seat cushion very well.  But, somehow it didn’t seem colorful enough for me.  I’ve been wanting to add some brighter colors (in moderation) to the living room to pep it up a little.  This didn’t seem to be serving that purpose.  My husband felt the same way, saying that the leaves stood out too much and not the flowers.  Good point.

So, scratch that one.  I’m glad I didn’t sew first and change my mind later!  The original cushion looks more colorful and so it stays – unless I find something I like better to use for a cover. :-)

Saturday, March 1, 2014

Sew Happy Saturday – A New Pillow Cover


Years ago my mom covered a foam cushion for me with crocheted granny squares.  I’ve loved that pillow ever since she gave it to me.  It was the only pillow I could stand to lay my head on when I had sever migraines in my teens and early twenties.  It has even traveled with me.  I use it still for my afternoon naps in the living room because it is still a comfortable cushion for sleeping on.  I really wish that we could get foam pillows of that type today!  It’s the best I’ve ever had.

But, as with all things, age has caused some wear and tear.  Though the foam itself is still comfortable, the fabric covering on the foam is starting to disintegrate.  I was afraid of damaging the the crochet cover by taking it apart to re-cover the foam itself, so I have been using a pillowcase over it.  Recently, though, I decided to make a new cover for it – something that would go in our living room.

I got this pretty white poinsettia fabric on sale at Fabric.com.  For some reason this fabric is nostalgic to me.  My mom and Gramma Hoover both loved poinsettias, so maybe that’s part of the reason. :-)  Anyway, I made a simple fold-over type cover.  It isn’t tricky at all, and I didn’t even add a closure on the back, though I may later.

First, I measured and cut the fabric to the width I thought I needed – in this case about a half yard.  I folded under one selvedge edge and sewed it.  Then I measured again to see how much I needed to have it overlap and added some extra for hemming.  I cut off the excess, then folded under the raw edge twice and sewed that.  Lastly, I folded the whole thing right sides together with the desired overlap (making sure the double-folded edge was on the actual outside), lined up the sides and sewed the side seams.  Then I just turned it right-side-out and ironed it one last time.  Easy-peasy.

Here is what the back looks like.  It is a little loose because I got it a bit too wide.  This could be easily improved by turning it inside-out and sewing one end in a bit farther so that it fits more snugly.  Also, I could add a Velcro® closure here.

Over all I’m quite happy with it, though, and this cover will be easy to remove for washing.  I have another half yard of the fabric and I may make a second cover so that I can simply swap them once in awhile for washing purposes.

Side note: The lace covered pillow beneath is a bed pillow in a pillow sham from a lovely crocheted bed set a friend gave me.  (Yeah, I used “pillow” three times in one sentence.  Keep reading.  I outdid myself.  hehe)  The bed coverlet itself was stained and I couldn’t get it clean, so I am using the pillow shams in the living room.  I put a solid colored pillowcase on the pillow first then put the crocheted sham on over it.  Since I have two, I swap them out once in awhile for washing and ironing.  The pillow is part of my napping arrangements, and it looks much dressier and appropriate for the living room in it’s pretty sham.  It’s a nice way to “upcycle” or repurpose a pillow sham, and at the same time have a bed pillow in the living room that looks like it belongs here. :-)  (It’s also handy for shorter people sitting on our couch to have this pillow to put behind their backs.)

Here’s a video tutorial to help you make your own, using a slightly different method.  This is a very easy project.  You could give your living room a whole new look in one afternoon with some fabric from your stash. :-)

Tuesday, February 11, 2014

Smart Living


My mom and I some years back organizing her “smart living” pantry.

My friend, Jo, at “Stop – Have At Chat” made this excellent list of suggestion for what she prefers to call smart living.  Please go over and take a look if you want some useful hints on how to live “smart”. :-)

She writes, “I don't like the word "frugal" living as it doesn't sound like a lot of fun.  It sounds like drudgery to me.

I much prefer to use  "smart living" instead, now that sounds like much more fun.

Smart living isn't just about making your money stretch further, but:

  • not wasting what you have
  • using what you already have
  • valuing what you have
  • thinking careful before adding to what you have.”

Continue Reading.

Tuesday, January 21, 2014

New Year, New Challenge – Get Rid of 365 Things in 2014


As some will remember, I’m not a fan of New Year’s resolutions.  Solomon said,  “Better is it that thou shouldest not vow, than that thou shouldest vow and not pay.”  Ecclesiastes 5:5  So, I try to avoid making commitments to things in that way.

However, this year I have made a goal or challenge – not a promise – to try to get rid of 365 things.  I hope that it is a reasonable goal, and with the pile in our garage it should be feasible.  We’ll see how it goes over the long haul.  If I don’t accomplish the goal, no harm done anyway.

I am not doing this like the “Get Rid of 50 Things” challenge.  If I get rid of some books I may count each one, and if I get rid of more later they will be counted separately.  But, I am combining some things.  The several pounds of beans I got rid of, though not all in the same container, counted as one thing on my list, but the 2 shirts and 2 mugs were each listed as separate items. :-) 

The first week of January – which was less than seven days – I got rid of 7 things.  The second week I got rid of 6 things.  I do want to get ahead on some things so that I can take some weeks off.  But, so far it is easier than you might think.  Because I had already worked on the 50 Things challenge and made my list of questions for getting rid of items, they have become sort of subconscious and it’s not quite as hard now to look at something and honestly tell myself whether I can discard it or not.

This could technically fall under the “Laying Aside Weights” series, but since I did something similar with the 50 Things challenge, I think I’ll keep it separate at this point.

I keep track of my progress in my new daily planner on the weekly pages where I write my weekly goals and “to do” lists.  I may try to give some updates over the course of the year, but we’ll play that as it comes.  No promises on that either. :-)  I would like to give some photo examples of improvements that have come about through this plan.  We’ll see if that ever works out.

Is this something you could do too?  Give it a thought.  If you need to start with a smaller goal try 52 things – one a week.